Learn how to implement effective firewall protection in Kubernetes clusters using Network Policies and CNI plugins. Discover best practices for securing pod-to-pod communication and controlling traffic flow within your cluster.

Kubernetes Firewall: A Practical Guide

Securing traffic in a Kubernetes cluster requires a blend of native firewall-like features and policy management tools. Kubernetes Network Policies provide essential firewall capabilities to safeguard intra-cluster communications.

This article explores the basics of Kubernetes networking, Network Policies, and best practices. We also explore implementation options through popular third-party applications.

It's important to note that deploying a dedicated firewall in front of the cluster is also an option, depending on your network architecture. This approach offers the advantage of intercepting potentially malicious traffic before it reaches the cluster's internal resources. However, the specifics of such implementations fall beyond the scope of this article.

Summary of key Kubernetes firewall best practices

Best practice Description
Use a least-privileged approach Start by denying all traffic and intentionally letting traffic in through a firewall.
Monitor and audit Network Policies As the number of Policies grows, so does the potential performance impact. Monitor and regularly audit your Network Policies to ensure they are being used most effectively.
Consider performance and scalability. Kubernetes allows you to choose how networking is implemented on your cluster. Consider the size of your cluster and the scale at which you think you’ll grow when choosing an application.

Kubernetes networking basics

Networking in Kubernetes can be complicated, but understanding a few fundamentals will help you better understand the concept.

In this article, we assume a basic understanding of computer networking. This section discusses Kubernetes-specific topics such as the container network interface, pods, and services and how they relate to firewall protection.

Pods

A Pod, the first fundamental object, is the smallest unit in Kubernetes. It represents a user workload and one or more containers running within it. Every Pod is assigned an IP address. By default, all pods can communicate with each other. If there is more than one container within a pod, they communicate via localhost with each other.

Network Policies, which we’ll explore in the next section, are a protection layer for your pods. They define which traffic can enter (ingress) or exit (egress) the pod.

Service / Ingress

If your application runs on multiple pods, you will want to create a Service, a Kubernetes resource that exposes a single IP from the cluster or port and load-balances traffic to all the nodes.

It is fundamental to Kubernetes networking because it provides a single entry point for a selection of pods, which can then be used by an Ingress controller to expose the application to the public.

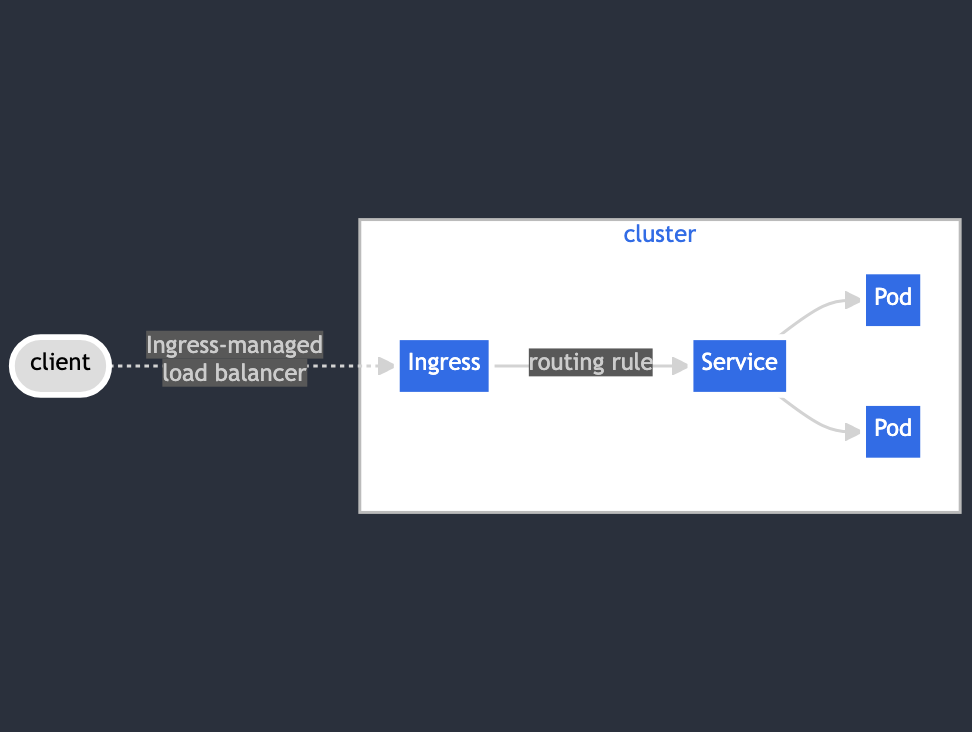
An Ingress handles routing external requests to internal resources. The graph below depicts the flow of requests and where Ingress and Service fall into the workflow.

(Source: https://kubernetes.io/docs/concepts/services-networking/ingress-controllers/)

Ingress and Service are noted here to complete the basics of Kubernetes networking but do not directly provide any firewall protection to the cluster.

Container Network Interface (CNI)

Kubernetes does not have a default system for handling networking between pods. Instead, it has a set of specifications that third-party plugins and CNIs implement.

At a basic level, a CNI must implement two things.

  1. All pods can talk to each other across the cluster
  2. All cluster agents on a node must be able to communicate with the pods on that node.

Past that, it is really up to the provider. This article discusses a few popular ones, and it’s important to note which ones implement Network Policies.

Comprehensive Kubernetes cost monitoring & optimization

Kubernetes Firewall with Network Policies

By default, all pods can communicate with each other across all nodes as one big network. To restrict access or isolate workloads, you need to implement Network Policies. They act like a Kubernetes firewall, allowing you to define rules for traffic flow within the cluster.

Network Policies are a cluster-scoped resource, which means they are cluster-wide rather than just within a namespace. When set, they determine the traffic that can flow in and out of pods grouped based on a namespace, label, or IP address block.

It is important to note that without a Network Policy, all ingress and egress traffic between pods is allowed by default. Once a Network Policy is defined, only traffic that matches the rules is allowed; all other traffic is denied.

Below is a basic example of a Network Policy. It allows traffic to the namespace “app-namespace” from pods labeled “my-app.”

apiVersion: networking.k8s.io/v1
kind: NetworkPolicy
metadata:
  name: allow-pods
  Namespace: app-namespace
spec:
  podSelector:
    matchLabels:
      app: my-app
  policyTypes:
  - Ingress
  ingress:
  - from:
    - podSelector:
        matchLabels:
          access: allowed

Note that any pods labeled my-app, regardless of the namespace, can reach pods in the app-namespace, but no other pods can access them. This is the basic premise of a Kubernetes firewall.

In the next example, we allow traffic from all namespace-b pods to reach pods in namespace-a.

apiVersion: networking.k8s.io/v1
kind: NetworkPolicy
metadata:
  name: allow-from-namespace-b
  namespace: namespace-a
spec:
  podSelector: {}
  policyTypes:
  - Ingress
  ingress:
  - from:
    - namespaceSelector:
        matchLabels:
          name: namespace-b

Next, let's look at Policy implementation considerations.

Use a least-privileged approach

By default, pod-to-pod communication is unrestricted, so the best practice is to start by creating a least-privileged approach to your deployments.

This is an example of an explicit deny-all Network Policy that you can use to deny all traffic to a namespace unless another Network Policy allows it.

kind: NetworkPolicy
apiVersion: networking.k8s.io/v1
metadata:
 name: default-deny
 namespace: namespace-a
spec:
 podSelector:
   matchLabels: {}
 policyTypes:
   - Ingress
   - Egress

Once you know which pods need to communicate, you can create a Network Policy that allows pods grouped by either namespace or labels to communicate. By doing this, you implicitly set a deny-all for all other traffic.

K8s clusters handling 10B daily API calls use Kubecost

You can take this further by implementing a Network Policy for egress traffic, ensuring that only the traffic you want leaves your pods.

Here is an example of a single Network Policy that allows ingress traffic from namespace-b and egress traffic to namespace-b.

apiVersion: networking.k8s.io/v1
kind: NetworkPolicy
metadata:
  name: allow-ingress-egress-namespace-a
  namespace: namespace-a
spec:
  podSelector: {}
  policyTypes:
  - Ingress
  - Egress
  ingress:
  - from:
    - namespaceSelector:
        matchLabels:
          name: namespace-b
  egress:
  - to:
    - namespaceSelector:
        matchLabels:
          name: namespace-b

This isolates namespace-a from any other ingress or egress traffic. This task can take some fine-tuning as you learn your application's traffic needs.

Monitor and audit Network Policies

You should monitor and audit your Network Policies because their implementation adds a layer of processing that all requests need to pass through for validation. Understanding them leads to better usage of resources.

As a Kubernetes administrator, the easiest way to audit your Network Policies is to view them from the command line.

$ kubectl get networkpolicies -A
NAMESPACE     NAME                               POD-SELECTOR   AGE
namespace-a   allow-ingress-egress-namespace-a   <none>         29m
namespace-a   allow-ingress-from-namespace-b     <none>         33m
ping-deploy   allow-pods                         app=my-app     124m

You can describe any Network Policy to get additional information on what it allows.

$ kubectl describe networkpolicy allow-ingress-egress-namespace-a -n namespace-a
Name:         allow-ingress-egress-namespace-a
Namespace:    namespace-a
Created on:   2024-06-18 16:10:13 -0400 EDT
Labels:       <none>
Annotations:  <none>
Spec:
  PodSelector:     <none> (Allowing the specific traffic to all pods in this namespace)
  Allowing ingress traffic:
    To Port: <any> (traffic allowed to all ports)
    From:
      NamespaceSelector: name=namespace-b
  Allowing egress traffic:
    To Port: <any> (traffic allowed to all ports)
    To:
      NamespaceSelector: name=namespace-b
  Policy Types: Ingress, Egress

Other options for monitoring and auditing depend on the cloud provider and the CNI you are using. For example, if you are using Google Cloud (GKE), you can set up logging of your Network Policies. Below is an example of a log entry from GKE’s documentation on network policy logging. You will see that you get the source and destination IP and the source and destination namespace and pod.

{
   "connection":{
      "src_ip":"10.84.0.252",
      "dest_ip":"10.84.0.165",
      "src_port":52648,
      "dest_port":8080,
      "protocol":"tcp",
      "direction":"ingress"
   },
   "disposition":"allow",
   "policies":[
      {
         "name":"allow-green",
         "namespace":"default"
      }
   ],
   "src":{
      "pod_name":"client-green-7b78d7c957-68mv4",
      "pod_namespace":"default",
      "namespace":"default",
      "workload_name":"client-green-7b78d7c957",
      "workload_kind":"ReplicaSet"
   },
   "dest":{
      "pod_name":"test-service-745c798fc9-sfd9h",
      "pod_namespace":"default",
      "namespace":"default",
      "workload_name":"test-service-745c798fc9",
      "workload_kind":"ReplicaSet"
   },
   "count":1,
   "node_name":"gke-demo-default-pool-5dad52ed-k0h1",
   "timestamp":"2020-06-16T03:10:37.993712906Z"
}
Learn how to manage K8s costs via the Kubecost APIs

Choosing your CNI

Implementing Network Policies as a Kubernetes firewall adds a layer of processing that can impact performance depending on your cluster size. As your cluster grows, the number of Policies, rule complexity, and traffic volume can all adversely affect performance. While there is no explicit limit on the number of Network Policies, the more policies you have, the more complex they are to manage.

When evaluating a CNI's performance and scalability, consider the following.

Complexity

Some CNIs are easier to deploy than others. When choosing a CNI, consider how much prior networking knowledge you need. For example, Flannel is touted as one of the simplest to run. However, it does not implement Network Policies and recommends Calico for that. So you end up having to learn two products. OVN-Kubernetes covers all the bases but could be more complex if you are unfamiliar with OVN (Open Virtual Network).

Resource consumption

A growing cluster usually means more pods are running, consuming more resources. On a Kubernetes cluster, the system components have memory reserved for them to run. The pods that a CNI creates are not part of this reserve. Instead, they are part of the same resource pool as the rest of the workloads. You may need to grow your cluster or re-allocate resources depending on your chosen CNI, so be sure to include the CNI in any resource monitoring.
For example, if you are using OpenShift with OVN-Kubernetes, you can enable logging for Network Policies. Calico also offers dedicated Network Policy logging and monitoring.

Cost

There are two things to consider with costs. The first is the cost of running the particular CNI itself. This can be done by using a third-party cost-monitoring platform like Kubecost. If you have diligently labeled your workloads and cluster resources, allocating costs is straightforward.

The second area to consider is any licensing fees associated with the CNI. While many CNIs are open-source projects, you may want to purchase licenses for enterprise support.

Ultimately, cost ties into complexity and resource consumption. A more complex CNI that requires more resources incurs more costs. If you need help running a more complex CNI, that could also incur expenses in the form of enterprise support and licenses.

Conclusion

A firewall's goal is to restrict or grant access to a resource. Understanding how traffic moves from one pod to another or in and out of your Kubernetes cluster is essential for implementing your firewall. Starting with a least-privileged approach ensures you do not let in traffic you do not expect. Start by denying all access to the cluster or pod and then filter traffic with Network Policies.

You will need a CNI for your firewall implementation. Ultimately, the CNI you choose depends on your required resources and expertise.

You want to monitor and audit your firewall implementation while considering the performance trade-off to maximize your resources. Kubecost can help you track the implementation cost.

Comprehensive Kubernetes cost monitoring & optimization

Continue reading this series