Learn about ArgoCD use cases and follow step by step examples to implement ArgoCD in a GitOps pipeline following the best practices.

ArgoCD Tutorial

The widespread adoption of Kubernetes has highlighted the need for dedicated continuous delivery tools that are more Kubernetes-centric. While most Continuous Delivery (CD) tools can be adapted for Kubernetes, they are incapable of utilizing all Kubernetes features and lack a unified, seamless delivery experience. This is where a Kubernetes-focused CD tool like ArgoCD comes into play.

In this article we will examine the architecture and purpose of ArgoCD. We will also cover key features and provide a practical demonstration of both initial installation and the deployment of an application into a Kubernetes cluster. We will follow up with a few thoughts on its limitations and some important best practices from the experts.

What is ArgoCD?

ArgoCD is a declarative, GitOps-based continuous delivery tool that is designed for large-scale application deployment into Kubernetes. Unlike other CD tools, ArgoCD is designed to be lightweight, visually-oriented, and user-focused. It also eliminates the user interface clutter of other tools because it concentrates on deploying solely into Kubernetes.

Users can easily implement GitOps flows into their delivery pipeline, as ArgoCD is GitOps based. Deployment processes are simplified and more manageable because ArgoCD stores the “single source of truth” in its version-controlled repository.

Why do we need ArgoCD?

Administrators and developers can (and often do) adapt more traditional delivery tools to support Kubernetes application deployment. However, these tools require significant configuration and alteration to achieve this—often with unsatisfactory results. ArgoCD eliminates the requirement for heavy adaptation and provides an intuitive, user-friendly interface to deploy any application via YAML or Helm Chart. In addition, ArgoCD provides several compelling features that allow it to manage the entire lifecycle of Kubernetes hosted applications:

  • ArgoCD can directly query the status of deployed resources, providing visibility and relationship mapping between all underlying Kubernetes objects
  • ArgoCD simplifies troubleshooting and allows users to monitor the cluster easily
  • ArgoCD ensures configuration compliance by constantly monitoring the state of all resources
  • ArgoCD can conduct automated, corrective action in light of configuration drift (a feature unavailable to other traditional CD tools)

ArgoCD in a GitOps pipeline

GitOps is a core component of ArgoCD, allowing users to easily implement GitOps practices in their delivery pipelines. Since ArgoCD pulls all of its configuration from a git repository, any subsequent deployment will be as simple as a push operation.

As ArgoCD constantly monitors the state of all deployments, any changes to the repo are quickly identified and those changes are subsequently deployed to the cluster automatically. The best part is, these changes are version-controlled, enabling ArgoCD to easily roll back to a prior state should the need arise.

Getting to know ArgoCD

While ArgoCD is a popular Kubernetes oriented CD tool, it is by no means the only one. For example, Helm Charts provide a way to simplify application installation and updates in Kubernetes. Kustomize is available for managing Kubernetes configurations, and tools like Terraform are available for infrastructure changes. However, none of these tools can manage the application state within the cluster, keeping the application and its configuration within spec. When this capability is coupled with ArgoCD to create comprehensive delivery pipelines, it is the perfect application delivery tool for Kubernetes.

ArgoCD architecture

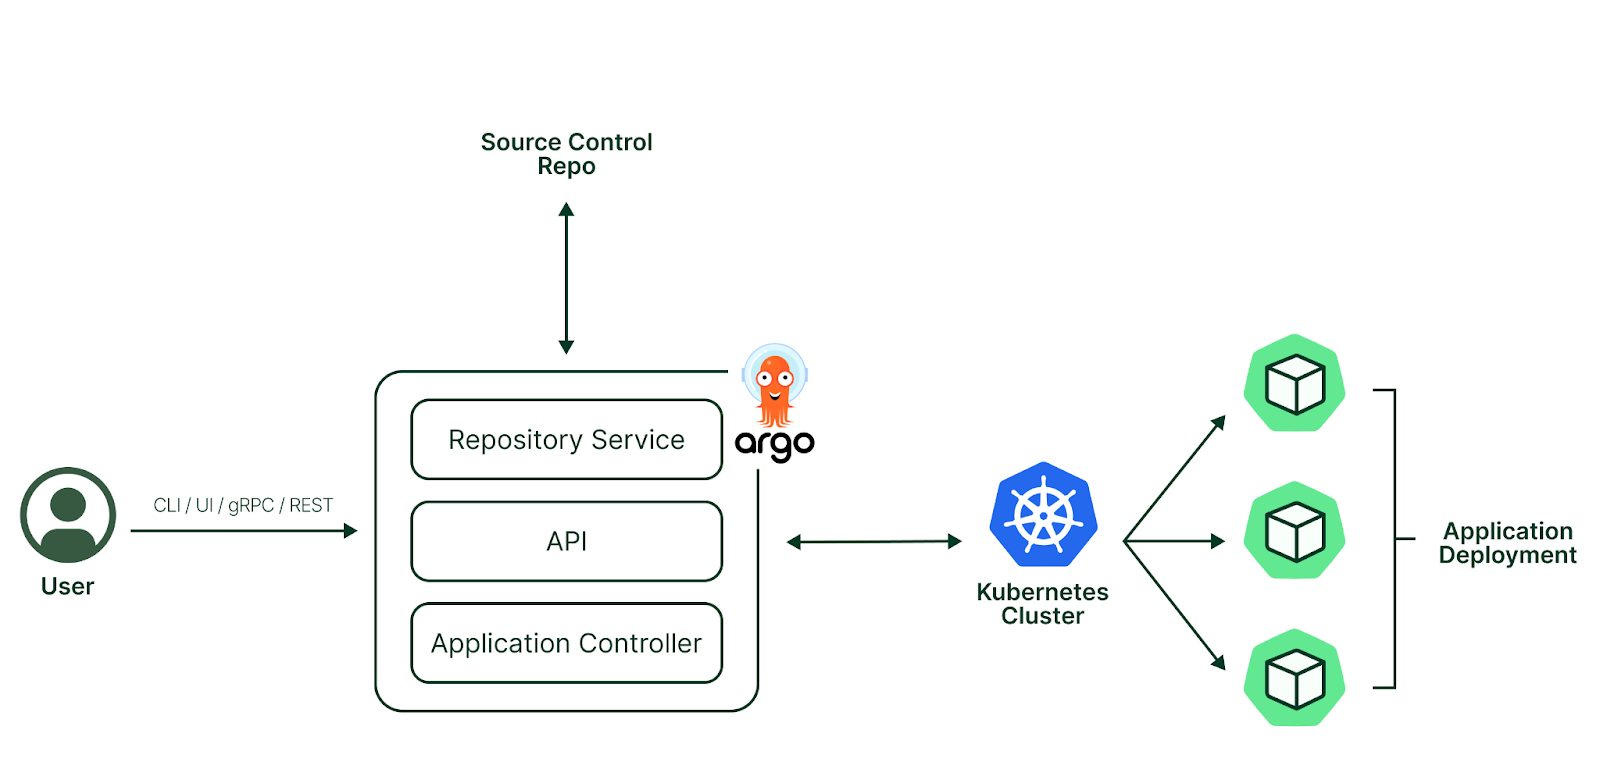
ArgoCD Architecture

Figure 1 - ArgoCD Architecture

ArgoCD is implemented as a Kubernetes controller. It continuously monitors applications running in the cluster and compares their current state with the state defined in the git repository, i.e. the desired state (see here for details). When an application deployed within a Kubernetes cluster deviates from its desired state, it is considered out of sync. ArgoCD reports the differences and can either automatically makes changes to match the desired state or alert an administrator to take manual action.

ArgoCD comprises three main components:

  • API server
    This gRPC/REST server exposes the API consumed by ArgoCD UI, CLI, and CI/CD systems. The API server is responsible for application management and status reporting, application operations, credential management, authentication, RBAC management and so on.
  • repository server
    This is an internal repository server that keeps a local cache of the git repository YAML manifests. It ensures that the configurations are always available and is responsible for fetching the manifests when requested.
  • application controller
    This is a Kubernetes controller that continuously monitors running applications. It is responsible for comparing the application state with the desired state in the target repo. Application Controller enables corrective action if the state is out of sync, and is also responsible for invoking user-defined hooks.

Key ArgoCD features:

  • automated application development across clusters and environments
  • integration with multiple configuration and templating tools, such as Kustomize, Helm, Ksonnet, Jsonnet, and YAML
  • multi-tenancy and RBAC policy support
  • automatic drift detection and visualization
  • easy rollback via storage of version-controlled configuration
  • complete application monitoring capabilities including health status analysis and Prometheus metrics integration
  • SSO support, WebHook integrations, and custom PreSync, Sync, and PostSync hooks for custom actions

Comprehensive Kubernetes cost monitoring & optimization

Implementing an ArgoCD pipeline

Now that ArgoCD has been introduced, let’s cover an example of installation and configuration to create a delivery pipeline. All examples in the following sections are based on a local Kubernetes cluster powered by Minikube 1.24.0 with kubectl 1.23.5 on a Windows 10 environment and ArgoCD v2.3.1+b65c169.

ArgoCD installation

Installing ArgoCD is relatively simple as it is installed into an existing Kubernetes cluster. First, we need to create a dedicated namespace for ArgoCD to run in. Then, we will install it via the installation manifest in the ArgoCD GitHub page.


kubectl create namespace argocd
kubectl apply -n argocd -f https://raw.githubusercontent.com/argoproj/argo-cd/stable/manifests/install.yaml

Use the “kubectl get all” command to verify that ArgoCD deployed to the argocd namespace.


kubectl get all --namespace argocd
NAME                                                    READY   STATUS    RESTARTS   AGE
pod/argocd-application-controller-0                     1/1     Running   0          8h
pod/argocd-applicationset-controller-66689cbf4b-cgk4w   1/1     Running   0          8h
pod/argocd-dex-server-7b896cc4f6-qpzgt                  1/1     Running   0          8h
pod/argocd-notifications-controller-77866c485-znsc6     1/1     Running   0          8h
pod/argocd-redis-d486999b7-27qhk                        1/1     Running   0          8h
pod/argocd-repo-server-bfd68b66f-wb57c                  1/1     Running   0          8h
pod/argocd-server-66fff94644-cxh8h                      1/1     Running   0          8h

NAME                                              TYPE           CLUSTER-IP       EXTERNAL-IP      PORT(S)
        AGE
service/argocd-applicationset-controller          ClusterIP      10.98.226.103    <none>           7000/TCP
        8h
service/argocd-dex-server                         ClusterIP      10.110.29.116    <none>           5556/TCP,5557/TCP,5558/TCP   8h
service/argocd-metrics                            ClusterIP      10.108.137.51    <none>           8082/TCP
        8h
service/argocd-notifications-controller-metrics   ClusterIP      10.111.127.168   <none>           9001/TCP
        8h
service/argocd-redis                              ClusterIP      10.100.180.73    <none>           6379/TCP
        8h
service/argocd-repo-server                        ClusterIP      10.102.48.55     <none>           8081/TCP,8084/TCP            8h
service/argocd-server                             LoadBalancer   10.108.199.200   10.108.199.200   80:32092/TCP,443:31477/TCP   8h
service/argocd-server-metrics                     ClusterIP      10.102.1.138     <none>           8083/TCP
        8h

NAME                                               READY   UP-TO-DATE   AVAILABLE   AGE
deployment.apps/argocd-applicationset-controller   1/1     1            1           8h
deployment.apps/argocd-dex-server                  1/1     1            1           8h
deployment.apps/argocd-notifications-controller    1/1     1            1           8h
deployment.apps/argocd-redis                       1/1     1            1           8h
deployment.apps/argocd-repo-server                 1/1     1            1           8h
deployment.apps/argocd-server                      1/1     1            1           8h

NAME                                                          DESIRED   CURRENT   READY   AGE
replicaset.apps/argocd-applicationset-controller-66689cbf4b   1         1         1       8h
replicaset.apps/argocd-dex-server-7b896cc4f6                  1         1         1       8h
replicaset.apps/argocd-notifications-controller-77866c485     1         1         1       8h
replicaset.apps/argocd-redis-d486999b7                        1         1         1       8h
replicaset.apps/argocd-repo-server-bfd68b66f                  1         1         1       8h
replicaset.apps/argocd-server-66fff94644                      1         1         1       8h

NAME                                             READY   AGE
statefulset.apps/argocd-application-controller   1/1     8h

By default, the API server is not exposed to an external IP. Users can expose it by converting the service to a load balancer, configuring cluster ingress, or using port forwarding. In this example we will enable port forwarding via the following command:


kubectl port-forward svc/argocd-server -n argocd 8080:443
Forwarding from 127.0.0.1:8080 -> 8080
Forwarding from [::1]:8080 -> 8080

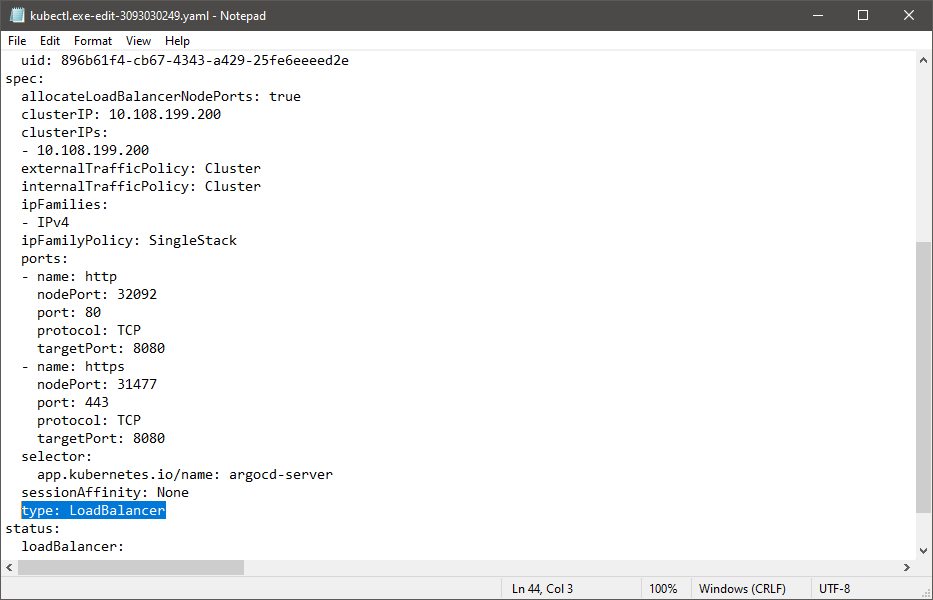
Alternatively, you can edit the service and change the service type from ClusterIP to LoadBalancer.


kubectl edit svc argocd-server -n argocd
Kubectl config

Once the service is running, users will need to obtain the password for the default admin account. This is stored in a secret, named argocd-initial-admin-secret. Use kubectl to get the password value from the secret. Then, use a base64 decoder to decode that value and obtain the password.


kubectl -n argocd get secret argocd-initial-admin-secret -o jsonpath="{.data.password}"

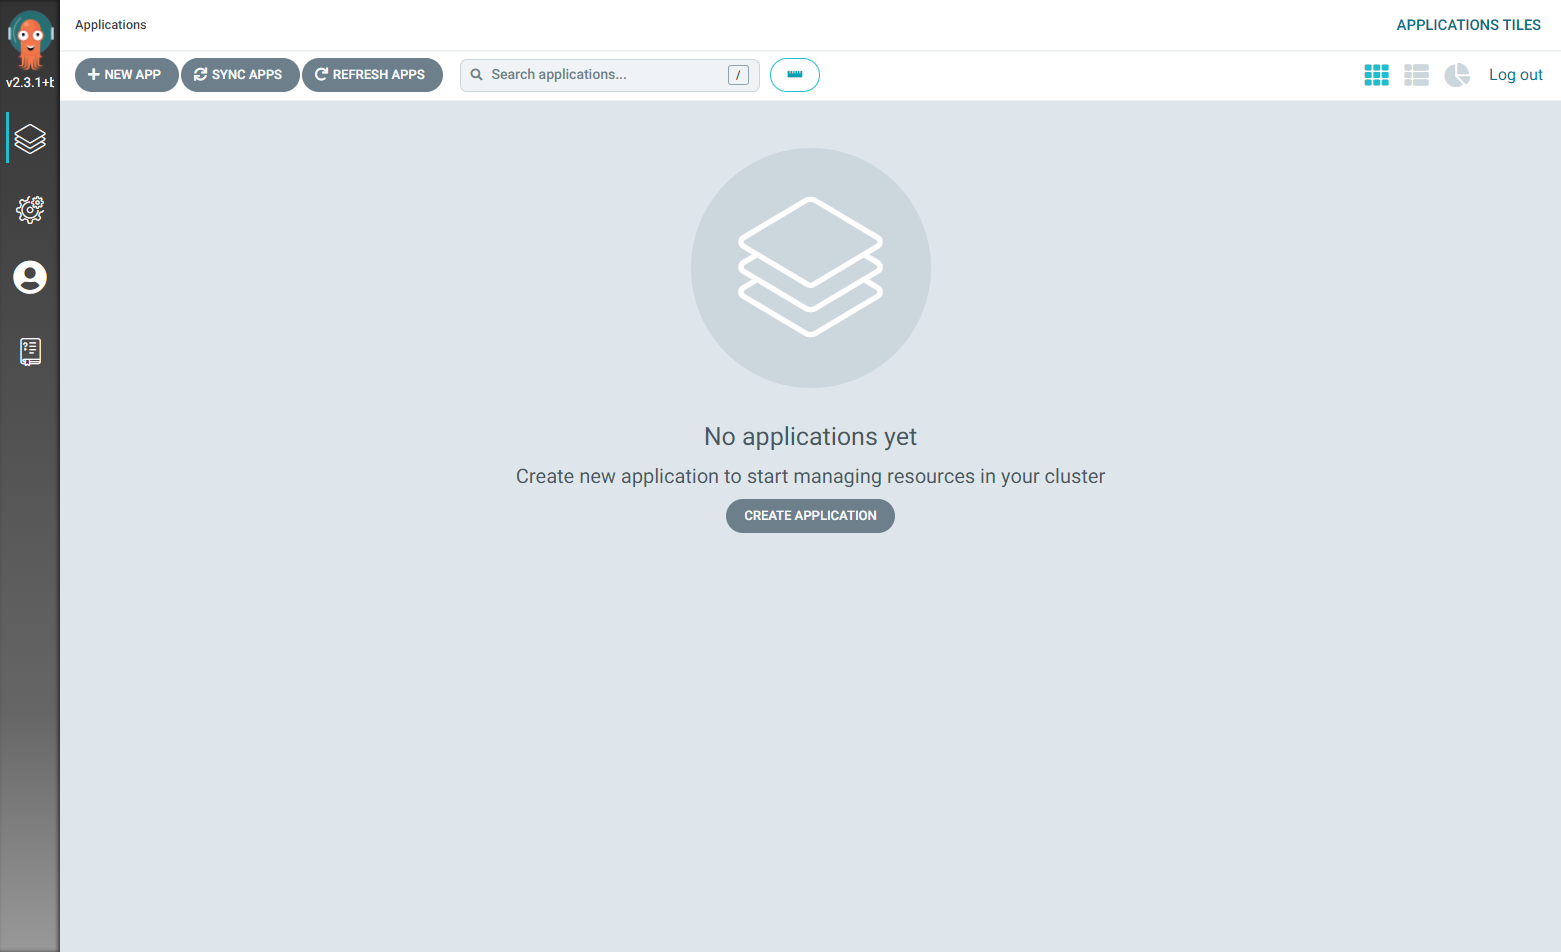
The ArgoCD interface will now be available via https://localhost:8080. Enter the admin credentials to access the interface.

ArgoCD Initial

Image shows initial ArgoCD interface

Note: ArgoCD also provides a CLI client that can run on Windows, Linux, and Mac environments. The CLI client is available from the ArgoCD repository here and must be downloaded manually.

To use the CLI, locate the executable and run the necessary commands. There is no need to install the CLI client. Windows users can log in to ArgoCD by running the CLI executable and typing the login command, shown below.


.\argocd-windows-amd64.exe login 10.108.199.200
WARNING: server certificate had error: x509: certificate signed by unknown authority. Proceed insecurely (y/n)? y
Username: admin
Password:
'admin:login' logged in successfully
Context '10.108.199.200' updated
K8s clusters handling 10B daily API calls use Kubecost

Deploying an application: pre-requisites

Now that installation is complete, the next step in our demonstration is to deploy an application. To do this, we need a demo application along with a git repository for the manifest files. In our example, we will use an Nginx deployment manifest stored in a public GitHub repository.


apiVersion: apps/v1
kind: Deployment
metadata:
  name: nginx-app
  labels:
    app: nginx-app
spec:
  replicas: 2
  selector:
    matchLabels:
      app: nginx-app
  template:
    metadata:
      labels:
        app: nginx-app
    spec:
      containers:
      - name: nginx-app
        image: nginx:latest
        ports:
        - containerPort: 80
        resources:
          requests:
            memory: "256Mi"
            cpu: "250m"
          limits:
            memory: "1024Mi"
            cpu: "500m"

nginx-deployment.yaml


apiVersion: v1
kind: Service
metadata:
  name: nginx-app-service
  labels:
    run: nginx-app-service
spec:
  ports:
  - port: 80
    protocol: TCP
  selector:
    run: nginx-app

nginx-service.yaml

Creating the application deployment

Applications can be created either via the CLI or the Web UI. In this instance, we will create the application using the WebUI.

Step 1: Login to ArgoCD and click on the NEW APP Button. This will open the application creation panel (below).
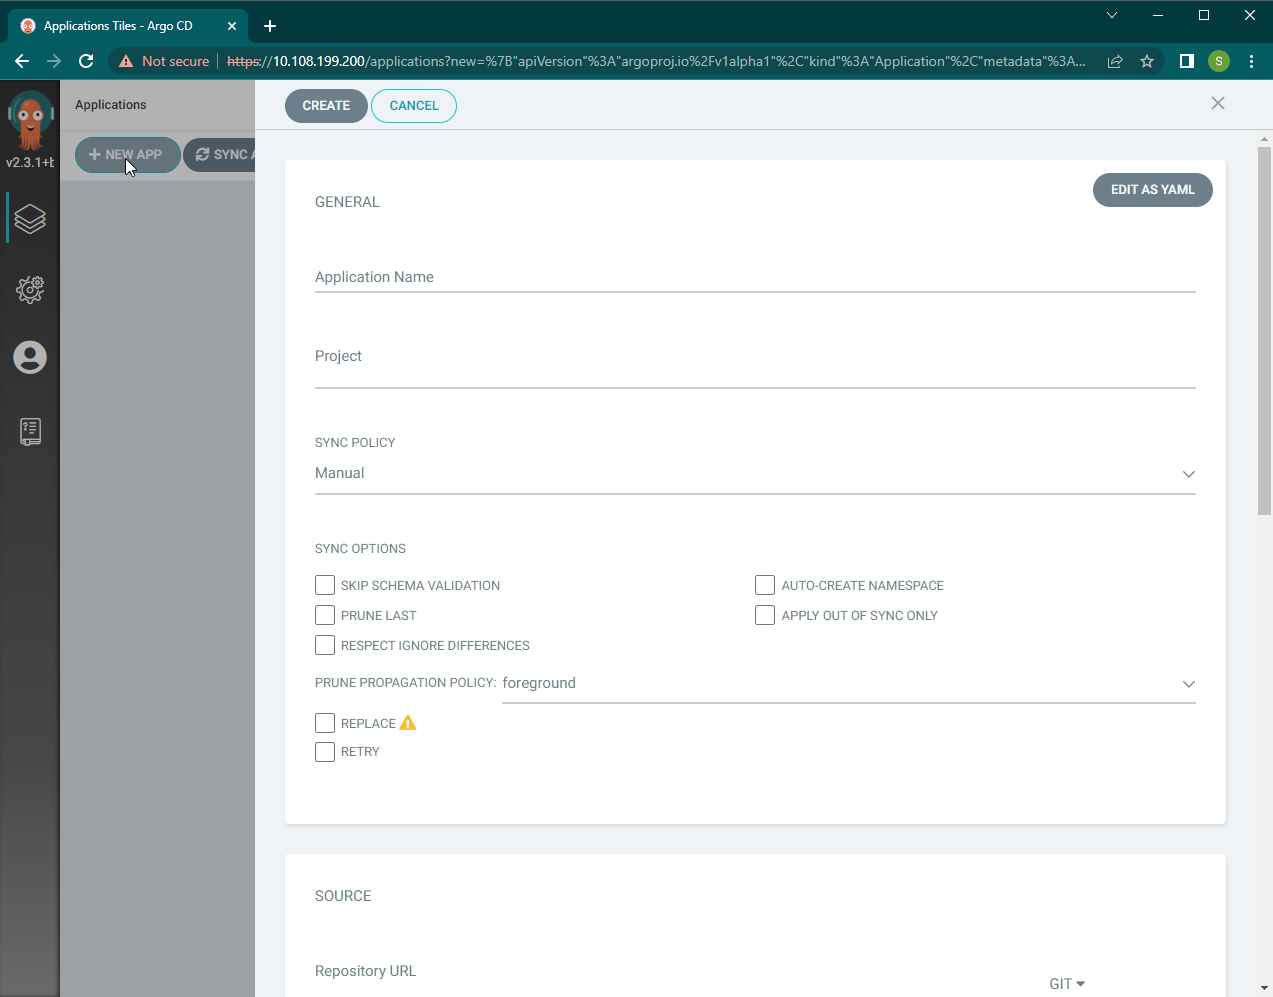
Application Creation Panel

Image shows the Application Creation Panel

Step 2: Provide the application name, project, sync policy, and options. Here we have selected the sync policy to be “manual,” which requires users to trigger synchronizations manually.
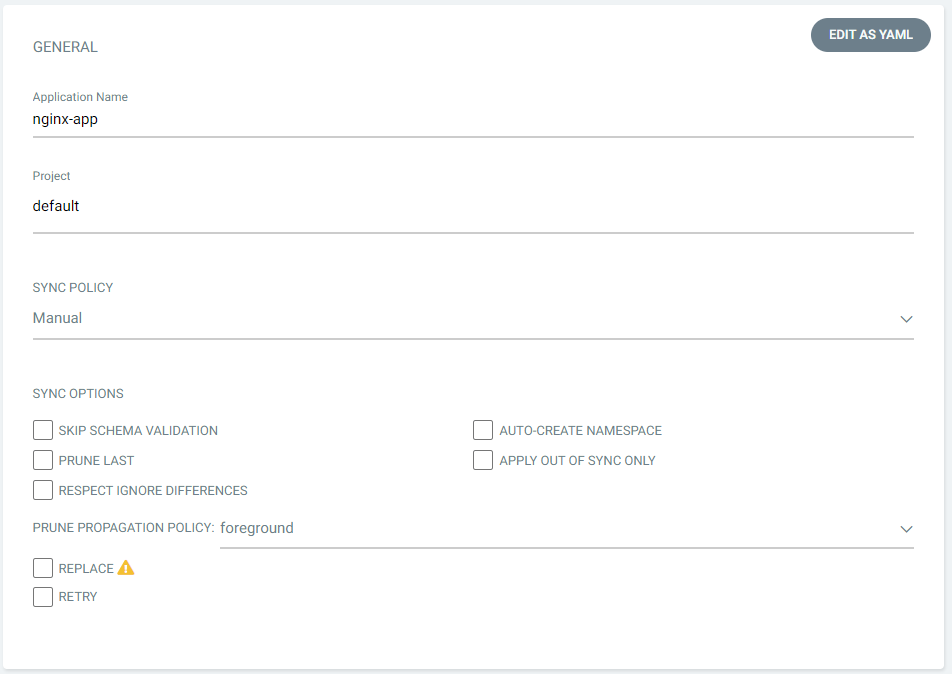
Application Creation General

Step 3: Provide the repository details where the YAML manifests are stored. If the deployment is a helm chart, provide the location here. If the repository requires authentication, configure the repositories using the Repositories section in the ArgoCD settings. ArgoCD supports the use of both HTTP and SSH credentials.
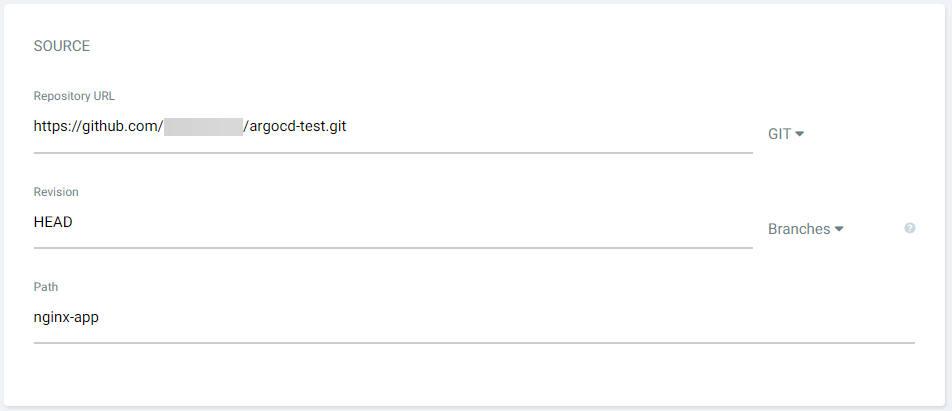
Application Creation Source

Step 4: Set the Destination. This is the cluster location where the application will be deployed. Users can select any connected cluster along with a namespace for the deployment. By default, it will point to the cluster where ArgoCD is installed. Here we will deploy the application into the default namespace of the local cluster.

Application Creation Destination

Step 5: Click on the CREATE button at the top of the panel.

Application Creation Create

This will create the application within ArgoCD, however its status will be reported as “missing and out of sync” as we have not yet deployed the application into the K8s cluster itself.
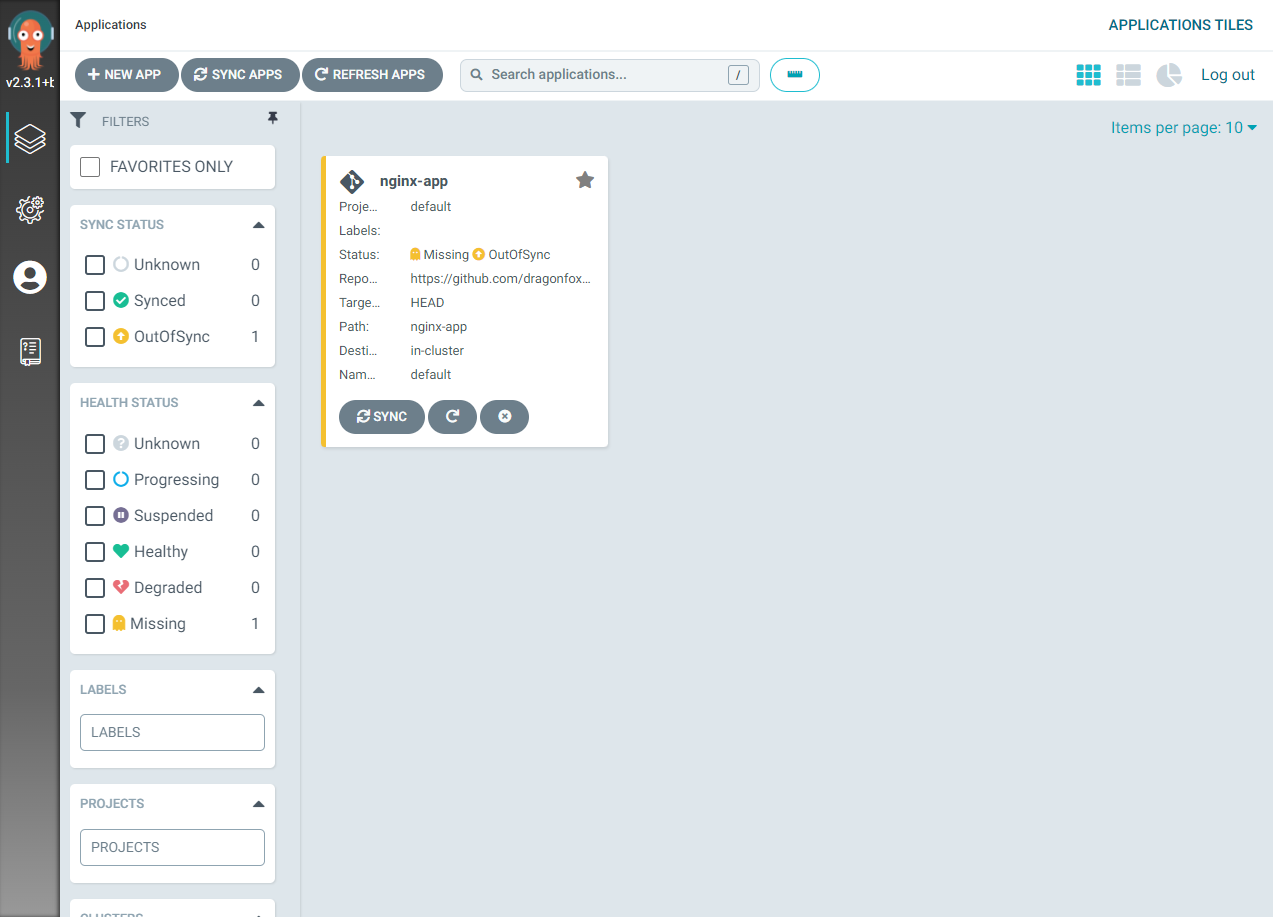
Application Creation Warning

Image shows a missing and out of synch warning

Step 6: Sync the application by clicking on the SYNC button in the UI, confirming the synchronization.
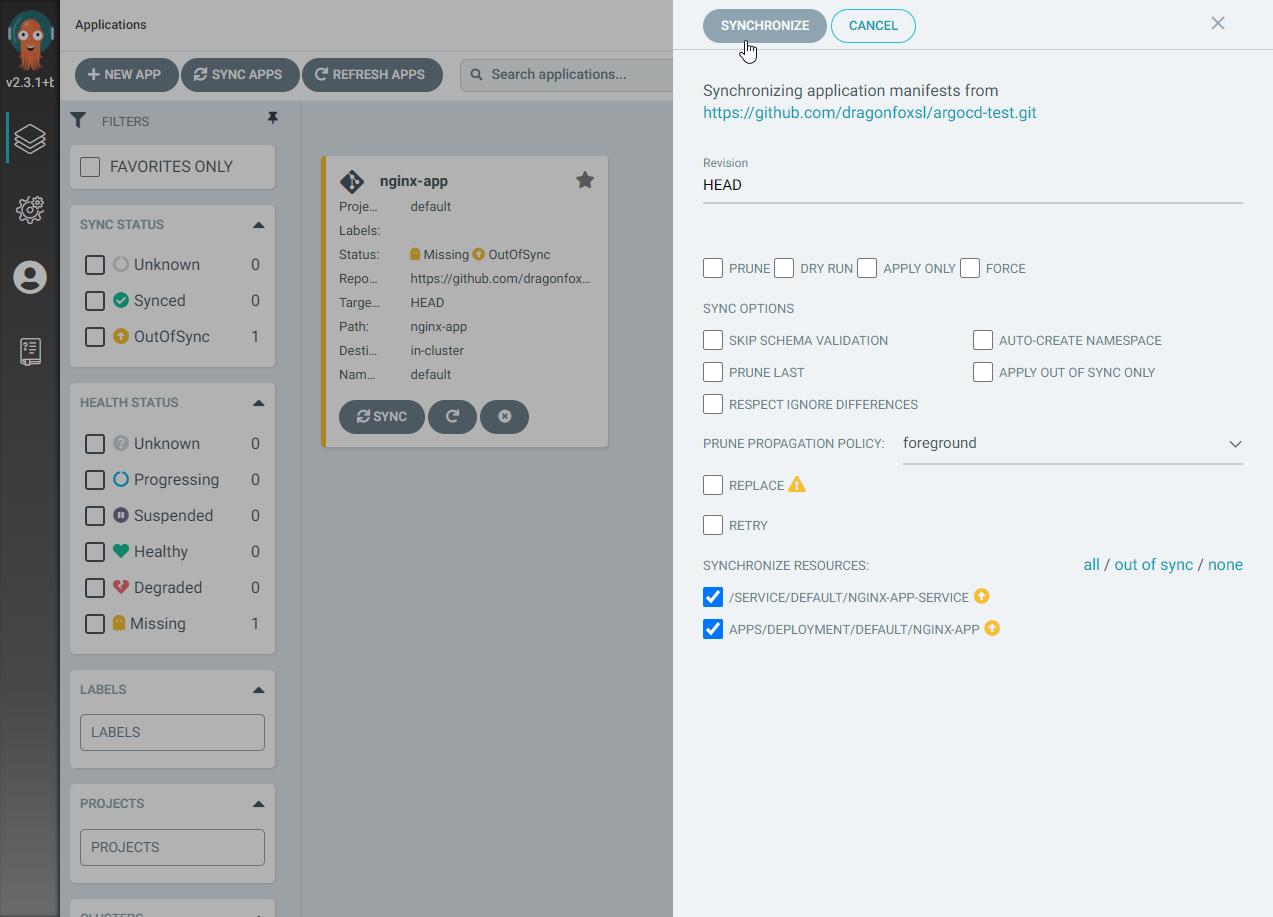
Application Creation Sync

Image shows the option to synchronize the application

This will obtain the manifest files from the git repository and carry out the necessary actions to deploy the application according to those manifests. The application status will change to “healthy and synced” once it has successfully synchronized.
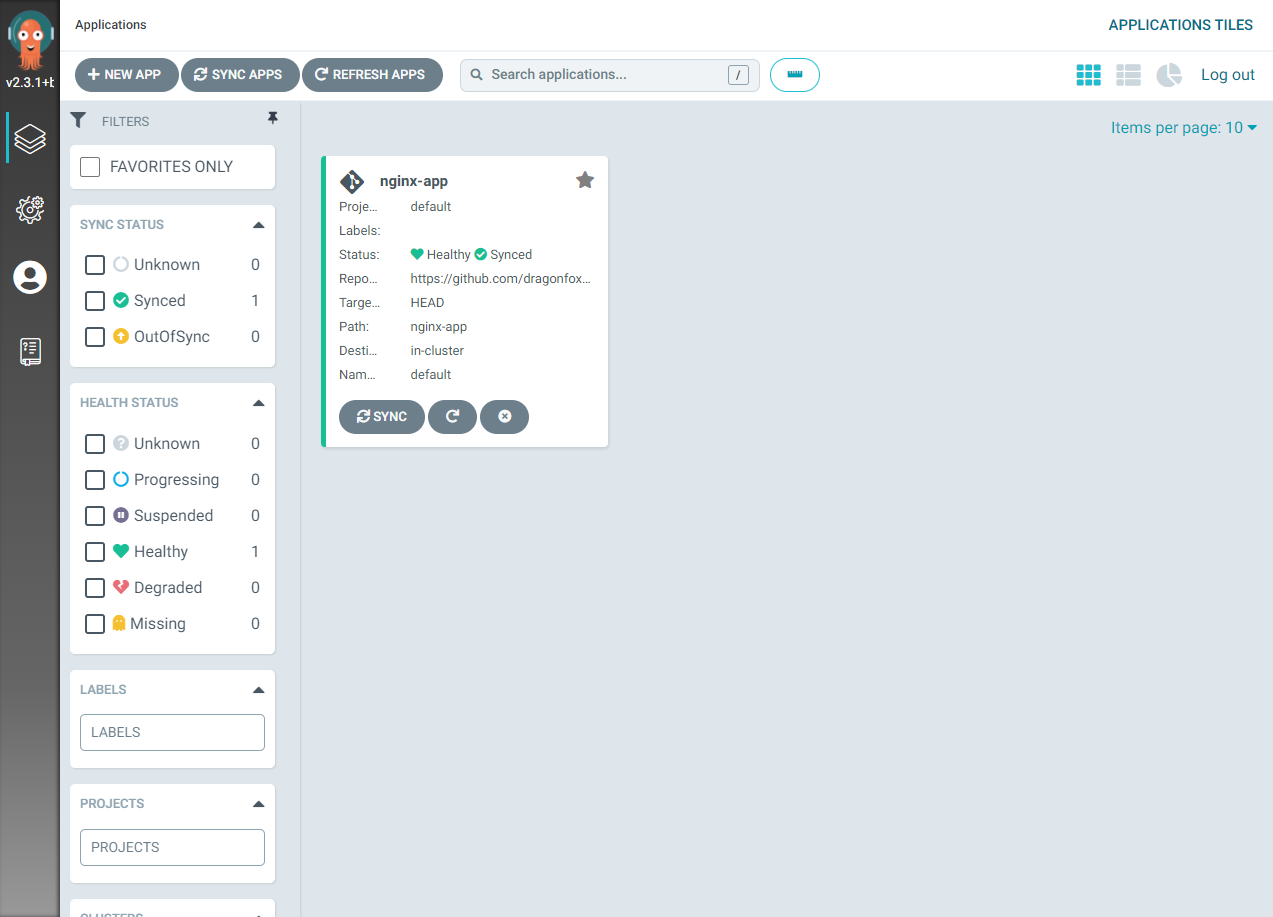
Application Creation Healthy

Image shows the applications is healthy and synced

Step 7: Verify the status of the deployed resources by clicking on the application. This will open the detailed application view. Here we can see a detailed view of all resources that belong to the application deployment, including status.
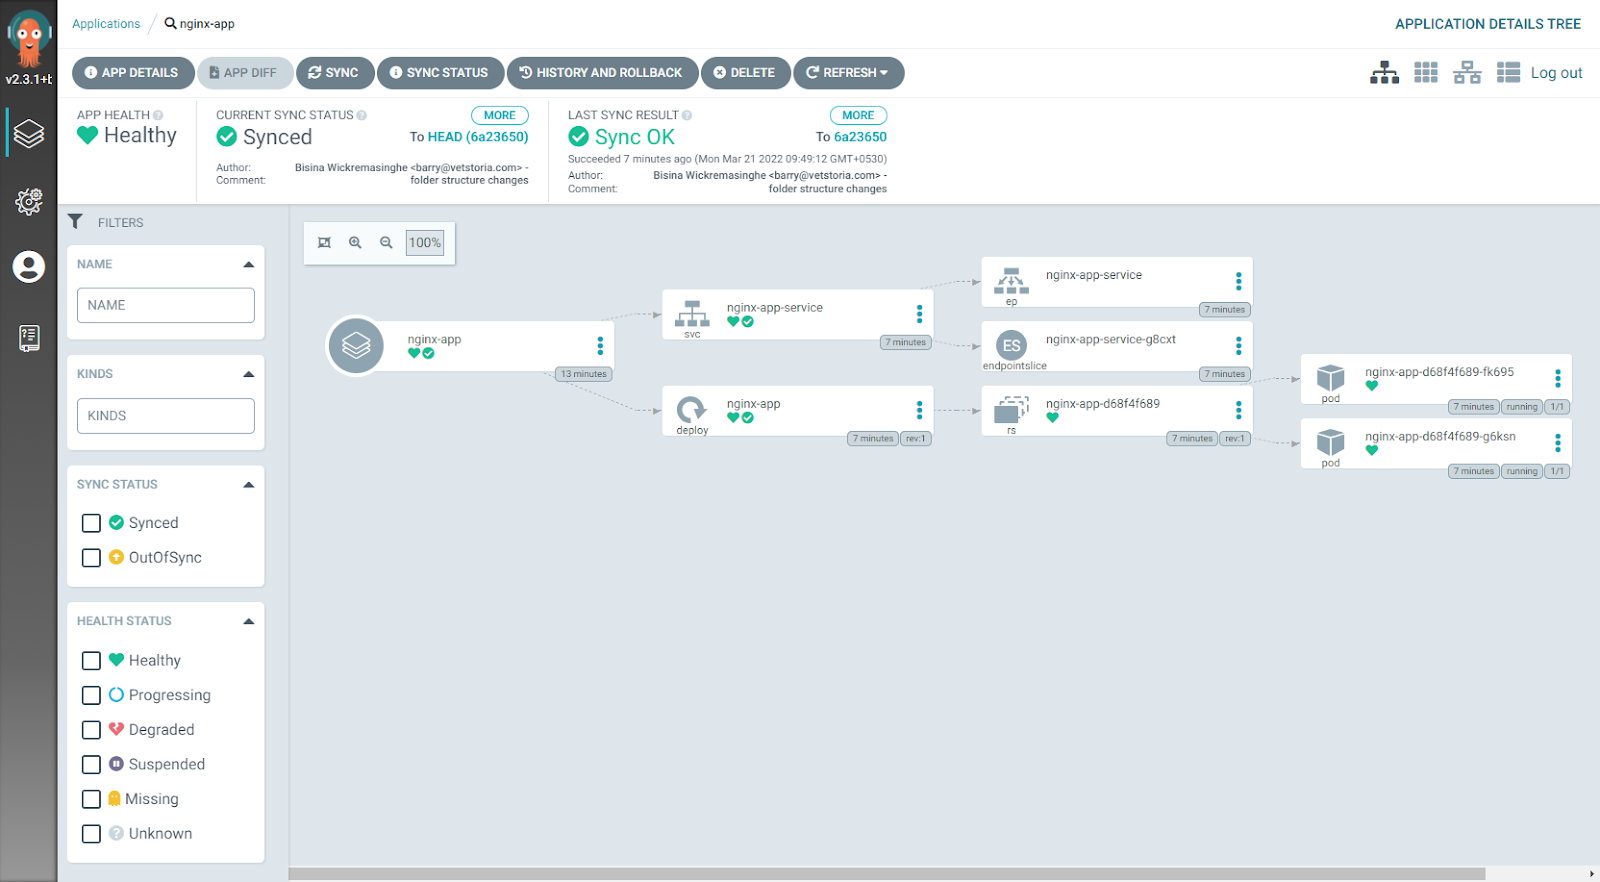
Application Creation Detailed View

Image shows the detailed application view

Users can also use the kubectl get all command to verify the deployment. This will list all resources within the default namespace, including our application.


kubectl get all
NAME                            READY   STATUS    RESTARTS   AGE
pod/nginx-app-d68f4f689-fk695   1/1     Running   0          103m
pod/nginx-app-d68f4f689-g6ksn   1/1     Running   0          103m

NAME                        TYPE        CLUSTER-IP       EXTERNAL-IP   PORT(S)   AGE
service/kubernetes          ClusterIP   10.96.0.1        <none>        443/TCP   7h58m
service/nginx-app-service   ClusterIP   10.105.104.111   <none>        80/TCP    103m

NAME                        READY   UP-TO-DATE   AVAILABLE   AGE
deployment.apps/nginx-app   2/2     2            2           103m

NAME                                  DESIRED   CURRENT   READY   AGE
replicaset.apps/nginx-app-d68f4f689   2         2         2       103m

That's it! We have successfully deployed an application into a Kubernetes cluster using ArgoCD.
Learn how to manage K8s costs via the Kubecost APIs

Limitations and challenges of ArgoCD

ArgoCD is an excellent tool for managing the life cycle of applications in Kubernetes. That being said, no tool is perfect and we will list some general shortcomings for your consideration:

Additional tooling required

Administrators will need to use a separate CD tool for the continuous integration portion of the delivery pipeline and keep both tools in sync, which increases management overhead. Furthermore, infrastructure level changes must be carried out manually or via an infrastructure as code tool like Terraform. This is because ArgoCD has no native infrastructure management capability. Even with a tool like Terraform, infrastructure changes must be managed either via a pre-deployment hook or another CD tool, since ArgoCD carried out the integration directly.

GUI/CLI overhead

Certain administrative tasks, such as user creation or adding new clusters, can only be achieved via the CLI. This means that administrators must use both the CLI and GUI to fully manage their delivery pipelines.

Support for non K8s environments

While ArgoCD is tooled specifically for Kubernetes, Kubernetes is not the only way to deploy containers. Managed services such as AWS ECS and Azure Container Instances are also popular options. Sadly ArgoCD lacks the native capability to support these, unlike other tools such as Jenkins. While is it possible for ArgoCD to be configured to support other platforms, this requires third-party tools such as cross-plane, which adds additional integration and management effort.

ArgoCD best practices

Separate config from source code

Users should always maintain separate repositories for configuration and application source code. This clearly delineates application configuration from code, which reduces the chance of code based misconfigurations impacting deployments and vice versa. Overall, this practice will also lead to better access control management and easier integration with CI/CD tools. This is because the CI/CD tools will now only target the repositories needed for specific application build and deployment actions. It is also a good idea to create separate repositories for each cluster or environment.

Ensure manifest immutability

Modifications to the upstream codebase can change how templates are defined when using templating tools. This can also impact the configuration of pre-existing templates. Pin the templates to specific comments using git tags or commit SHA to alleviate this issue.

Test manifests before any commit

Always verify the YAML configuration by validating the file using a tool like kubeval. Then, test the configuration in a local or test environment before pushing any changes to the repository monitored by ArgoCD.

Implement good secret management

Ensure that a proper secret management workflow is in place to manage all secrets within your environment, before implementing a GitOps workflow. Tools and services like Helm-secrets, Hashicorp Vault, and Kustomize secret generator plugins can be used to simplify this secret management process.

Conclusion

ArgoCD is a powerful tool that can manage Kubernetes application deployment at scale. It offers a user-friendly management experience without sacrificing functionality. Furthermore, it provides administrators with in-depth visibility and control over all managed resources and ensures configuration stability of applications. Finally, it also reduces management overhead and user error by automating both application delivery and drift detection in a manner customizable to suit almost any environment.

Comprehensive Kubernetes cost monitoring & optimization

Continue reading this series